July 30, 2011

envelope me

okay, remember the post about pillows awhile ago? well now we are going to make them. YES. (side note, i kinda changed the pillows i am doing....but we are still gonna make some cute pillows!) and envelope style pillowcases are so easy it is almost laughable.
i have tried using other tutorials to learn how to do it, but their math always leads me astray. so i am gonna make this super simple for everyone and just give you numbers. no calculating involve. that's my kind of math...

for one pillowcase you will need:
half a yard of fabric
coordinating thread
sewing machine

(you will want to make more than one though, so get lots of fabric)

GO!

1. cut a piece of fabric for your pillow form. here are the measurements for typical pillow sizes:
for an 18"x18" pillow form = cut a piece that is 19"x40"
for a 16"x16" pillow form = cut a piece that is 17"x36"
for a 14"x14" pillow form = cut a piece that is 15"x32"

* if you have a different size pillow form, the math is pretty simple. take the height and add 1", take the width and add 4"*

2. fold over the shorter sides twice, 1" at a time to look like this


3. pin it and sew near the inside of the fold

4. repeat to other side

5. fold your piece so that your two newly hemmed edges are on top of each other (it should start looking like a pillowcase now)

6. move the envelope edges to the center and make sure they overlap. measure your width (which should be a bit smaller than your pillow form so you have a tight fit) and measure your height so you know where to place the pins.


7. place pins on the top and bottom and sew

8. turn it inside and stuff your pillow inside


9. congratulations, you are an amazing person and your house looks great too.


go make some more! hahaha


next time, we will do the birdy pillow, which will just be an add-on to this post. kinda.

July 28, 2011

classy, classy bow ties

well hello everyone. i am going to teach you how to make bow ties for li' boys and grown men. yesssss

and off we go!
you will need
1/4 yard of fabric
some velcro
craft glue

1. measure an example for neck length and width. if an example is not available, measure around the person neck or even look it up online (from what i found, grown men are around 20" and little boys around 15"). the standard collar size (or neck width) would be 1" for a grown up and about .75" for a little boy.

2. cut a piece that works with your measurements, but make it about 1-2" longer than normal for room for the velcro (don't forget your seam allowance too!)


*for example, my little bow tie needed to be 13" long, i added 2 1/2" for velcro and 1/2" seam allowance, so i had a 16" band. the man bow tie needed to be 21", so i made my final band size 23".*


3. you can create the neck band two ways: A- sew a tube and turn it right side out using lots of patience OR B- you can glue it together. your choice :)

4. set the band aside to create the bow. here is a great tutorial on how to do it. don't attach the center tie on the bow, that will come later. remember, this is going right under a chin, so don't make it too big!

5. use the band to attach the bow to the band. i used glue, and it worked pretty well. remember to measure it to be in the center of the bow tie.


6. add some velcro! i had some sticky stuff, but if you have just normal velcro, just stitch through it to make it secure. 

7. voila! so flippin cute! ahhh!!!!!


8. with the extra fabric, make yourself a matching bow. sooo cute!

so is anyone out there as obsessed with bows as i am?! i almost want to just WEAR a bow tie.....hahaha


July 27, 2011

in the making

i got my tuberculosis shot today. i was so scared i actually don't remember how bad it was. however my husband took pictures.....so it couldn't have been that bad.

 i also got a sucker sooo obviously it went well. 

i have a couple tutorials coming up for you guys, namely, bow ties and all of those pillows i posted :) i know! exciting right! so exciting that i am thinking about doing a giveaway with them....hmmm....
well for now, i will give you teasers of the bow ties because i am slightly terrified to move my arm right now, in fear that it may hurt. (i know you are thinking right now 'who the heck uses their entire arm while typing?' i do people. i do.)


 expect the bow ties to be posted tomorrow! 


July 25, 2011

pillow me

so, this weekend we have weddings weddings weddings! everyone is getting married! good! so while i am busy, i need your advice. i am making a ton of pillows (by a ton i mean seven) and i want to glean knowledge from your minds. here we go....

i am doing two sets of three pillows that are the same and one that is rectangular. my color pallet- as of now- is red, tan, and white. here are my inspirations....

1. bow pillow in red
(find it here)

 2. bird pillow with tan background, one with all white and two red birds and the other with all red birds and two white birds
(find it here)

 3. white pillow with red writing
(find it here)

4. kite pillow....and here is where i need your help!
(find it here)

i don't know whether to do a...
red background with a white kite
red background with tan kite
white background with red kite

tell me tell me tell me! i need your help :)

July 22, 2011

granny chic-my grandma's treasury

my grandmother was a biker. no big deal. she and my grandfather were in an orange county based biker gang (nicest people ever, seriously) and she bought this right after my grandpa bought his first harley. she wore it on many a ride on the back of my grandpa's motorcycle. recently, she gave all of her grand-daughters a piece of her biker wardrobe. i opted for this denim jackety thing because i saw and thought denim vest much? i grabbed it, kissed her on the cheek and set to refashion it into something oh so chic.

so while this piece of clothing isn't traditionally 'granny', i wanted to make it my final post something from my actual granny. and i know she will love it :) thanks grandma!


before


after 


this was seriously just a bunch of cutting, seam ripping, sewing, repeating, and using a bottle of color remover. woo! i am alll about trial and error.


i hope you have enjoyed all of this week's refashions. if you have any questions about how anything was done, leave a comment! i will get back to you super fast to help out. and thanks liz from C&C for inspiring/forcing me to finally refashion all of this stuff! it was so much fun!

now go have a wonderful weekend!

July 21, 2011

granny chic- it's a freakin twofer

oh hay! so i took a day off (i know you all noticed) because i took this gorgeous floral dress and turned it into two gorgeous items of clothing. how did i get so smart....hahaha i think what is so amazing about this dress is that the fabric is really cool, but the way it was put together didn't do it justice.

i just did it justice. BAM!


before


after!


now before the tears that are welling up in yours eyes escape, know that i too am teary over this creation. i mean, is this top from urban? no. did it cost way less and look just as amazing? yes.
or the better question...is it so simple to make that even if you only have one hand you could make? 
probably. 
so go raid your local store and find something and make it adorably you. meeeow.

xoxo,
nicole


(i have always wanted to say that...)

July 19, 2011

granny chic- peter pan!

and we're off! i made an extremely claustrophobic turtleneck into this beaut. whenever i see someone in a turtleneck, i'm always suspicious of their necks....anyway, enjoy! 


                            before


                                              after
                                                                                                                                                                          

i am excited that this turned out so well since i was winging it. now, go raid your granny's closet and cut something up and make it look fantabulous

or look weird like me, whatever. hahaha

you like how my pictures look so nice all the time? (i have no shame. ahahaha) anyway, my wonderful husband manages to take all of these pictures in his busy schedule. you should totz hit up his website/blog here and look at his pretty pretty pictures :)


July 18, 2011

granny chic- mint 'n' chip

alrighty. i found this sweater awhile ago and put it in my scrap pile. C&C inspired me to take it out of that file and try to make it work! so....i did just that. i tried to make it work. and about halfway through i just looked at it and said dang. this is so ugly. hahaha so i slapped a bow on it and called it a day. it reminds me of mint chip ice cream now....yum yum yum


before


after


it is only day one people! check back for more granny-esque refashions!


ps- i also apologize for my lack of makeup. while packing at 6 in the morning for our trip down to visit family, i forgot all of my makeup. and forgetting makeup is way worse than like forgetting your pillow, or forgetting your phone charger. i have never forgotten something so important! i am very sad about it.....

have you ever forgot to pack something that was was super important?

July 16, 2011

LBD- NBD

oh hay! so when i started this jason mocked me because apparently the last time he saw velvet it was in the 80s. ouch. now i am determined to turn my mother's floor length, velvet skirt into a cute LBD for me. so.....velvet is making a comeback people! it just is!

just in time for the weekend, i have created a sexy lil' black dress just for you :) and to top it off, it is MODEST people! little skin and a lot of sophistication....and sexy. i was inspired by Sarah over at Welcome to the gOOd life and created that dress' evil twin. alrighty folks, off we go!

you will need....
an XL skirt
sewing machine
needle & thread
something to watch while doing this project because it is SO easy

okie dokie

1. cut the sides of the skirt to create sleeves; i do not have a picture of this part (sorry), but Sarah does! go check it out! (you kind of have to eyeball it. i measure around my arm to get some kind of a measurement, but don't forget a few inches of wiggle room)

2. cut the extra length off of your sleeves. i wanted above the elbow, so i cut off all the extra and put them aside for something special :)


3. sew up the sides of your skirt. and now it looks like this.....don't worry, your will give it life!


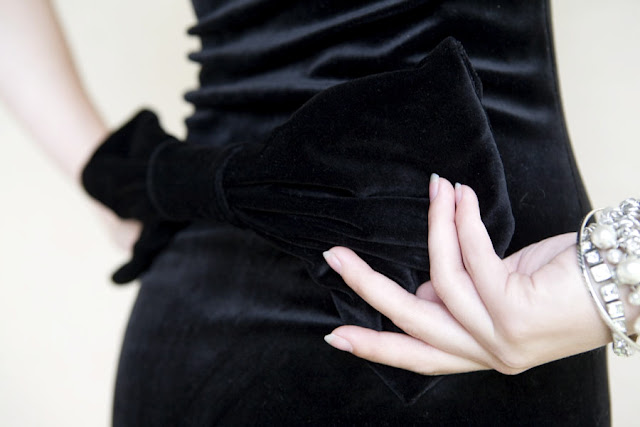
and will look like THIS! bam! work it girl! the waistband becomes your neckline and you can go back and sew a little more to show yo' curves. and jason said that velvet was 80s...pfff. more like totally hot right now!


but it is still a little boring.....i mean sure a skinny belt around the waist is GREAT and all but......we need a lil' spice. and even bangles cannot add spice. soooooo


WE ARE PUTTING A BOW ON IT.
that is basically the motto of my life. put a bow on it. you can never go wrong with a bow!
so you know those pieces you cut off to make your sleeves shorter?

4. make them into a rectangle. put right sides together and sew along the edges. leaving an opening at the bottom so you can turn it right side out. *keep a chunk off to the sides to make the middle strip*

5. squeeze it together in the middle and sew it together by hand.

6. take your extra scarp of fabric and create a little rectangle, right sides together. sew and leave room to fold it right side out

7. sew that onto your big bow

8. this is my obsessive bow step. you see how the one side looks like a bat and not a bow? this is easily solved by sewing those bat wings under.
that's what i call them. bat wings.


so sew them under

1
2
3
4
5


6

and BAM a perfect bow. nbd.


now to attach it.......right above your glamourous booty.

9. you can get someone to stitch it on after you place it, or put safety pins where you want it and slip it off, and hand sew it on. we want this bow to look like it's floating there.

10. you are done and you look freaking fantastic.

they say modest is hottest....i think this is the epitome of that. now go out and rock 'n' roll this dress around.


ps- i apologize for the semi-ghetto pictures. apparently velvet is an extremely difficult fabric to photograph. anddd my house is too small to find a place besides right next to the window on my desk :)


pps- i'm studying for the gre...any tips? hahaha

July 15, 2011

moment of silence.

yes people, it is officially over. harry potter is no longer with us. 

i am actually really sad about this. i don't think it is that nerdy....everyone loves harry potter.
but since we went to the midnight showing, i am too exhausted to really feel anything.

random side note, i was reading my daily dosage of blogs and i realized the extra cuteness factor i am missing. 
i do not have a cute, adorable child with a classy but cool name.

so from this moment forward, i am going to talk about my pet fish to make up for the gaping cuteness hole in my blog. i now present....

thor
thor is a little over 1 year old beta fish. he enjoys being fed and helping me with my homework. all of his brothers are dead. don't worry he never really knew them....and they weren't really related.
obviously he is not a child, but it's like parent training. start with a plant, then a fish, then a cat or dog. if you can keep them all alive, you can have a baby.
i think it is very logical.


check in tomorrow for a smokin' hot dress tutorial!

July 14, 2011

gathered together

so i love modcloth. love love love. but unfortunately, i hate spending money on clothes i think i can make. case in point this skirt


it is CUTE. it's bright, fun, perfect to add to my skirt collection.
but i refuse to spend forty bucks on a skirt that i found a tutorial for! ya! that's right! take it modcloth! i'm gonna make a skirt that kinda looks like that one and it will probably fit better! i'll make my own Tropical Daydream.....and here is what I came up with


guess what the name of this fabric is? kitschy kitchen. hahaha such a weird name.....anyway i got the tutorial from Anna from Noodlehead while she was guest blogging at crafterhours (she even tells you what you need, so i don't have to :) but remember to have extra for a sash!). since i wanted to use a patterned fabric, i left of the stencils. since Anna is a total pro, i have no need to explain the steps. just head on over there.....and we will pick up here with the sash. because having a huge bow at your waistline is the best thing ever.


the sash i made was 50 inches long and about 6 inches wide. 

1. putting the right sides together, sew a tube. 

2. using extreme patience, turn it right side out (it is pretty wide, so it should be pretty easy).

3. tuck the ends underneath and topstitch the whole dang thing until it looks like this


4. tie it around your waist and be fantastic.


such a good add to any wardrobe....i still think the name of the fabric is so weird. it's like when you hear an adult joke in a disney movie....you're like what? what storyboard creator got bored and added that one? anyone out here in cyber world ever used a fabric with a really weird name? weirder than kitschy kitchen?