i wanted a new desk
and i wanted to make it
i found a desk i liked, but the tutorial was so vague and the products aren't available in the US, so i figured it was time for a tutorial on
how to make your own 'reclaimed wood' desk

alright people. let's get down to business.

you will need (for one desk):
four pieces of 6"x5'x1" wood boards (we used pine)
two pieces of 2"x2'x1" wood (we used birch)
1 1/4" wood screws
2 ikea vika lerberg grey legs
minwax special walnut stain
minwax polycrylic finish
an electric drill
hammer
automatic sander
brushes (foam or bristle)
washcloths/rags
1. get all your wood to be the same size. we bought 6"x10'x1" and had home depot cut them in half for us, but really you just need the total depth of the desk to 24" and the total length to be 5'
also, try and find boards that have character, like a really interesting grain, or a big knot, or stripes. those 'flaws' in the wood make for a much cooler desk

2. sand them all down: front, back, and sides. the more you sand, the better the stain goes on!

3. now, we are going to distress our wood. this is where the hammer comes in. just bang up your wood a bit, at random spot. feel free to get creative

we used pliers, nails in a bag, a hammer, and other random tools to make scuffs, dents, and scratches. the more 'distressed' your wood, the more industrial it looks

now for the stain

we took some scrap pieces of pine and tested how much stain we like before trying it on our desks. also , you could use the side of the board you know will be on the bottom to test out the stain before you put it on top. i used Minwax's Special Walnut. i loooove it.
4. lay your boards flat with the top side up, making sure they are free of dust or any particles

5. start staining. i wanted my desk to be light, so i brushed it on and immediately followed it with a washcloth

after a few hours i did a second coat and wiped it off one minute after leaving it on and here is what it looks like

jason wanted darker, so we let one coat sit for 8 hours, then applied two more coats. his wood looks like this

basically, his is a bit darker.
6. once the top is stained just how you like it, stain the sides, the bottom, and the small stabilizer pieces and let them dry as the stain directions state
 |
| we only ended up needing four, by the way :) |
*we only sanded the ends of the birch stabilizers pieces, and stained them without sanding the rest. they turned out fine*
7. now for the ikea legs. you can either order these online like i i did because there isn't one nearby, or by them from the store. you'll want to order grey legs

8. get those screws out

and place the stabilizer pieces at the end of each side of your desk, about an inch from the end. drill one screw into each board one each side of the desk

9. now for a clear coat. i suppose you could have done this step right after staining, but i wanted my boards firmly all together when i started the clear coat. make sure to read all of the directions very carefully or it will turn milky, and no one likes milky stain.
no one.
this stain was actually perfect, even though it goes on a little purple. why? i do not know. but don't worry it dries clear with a it of gloss.

so apply the clear coat...

10. place your desk on top of your legs. now, if you want your desk extra extra stable, you could use some earthquake putty or velcro along the tops of the legs and attach it to the desk. this will make your desk stable and also easy to disassemble
11.um....you're done :)
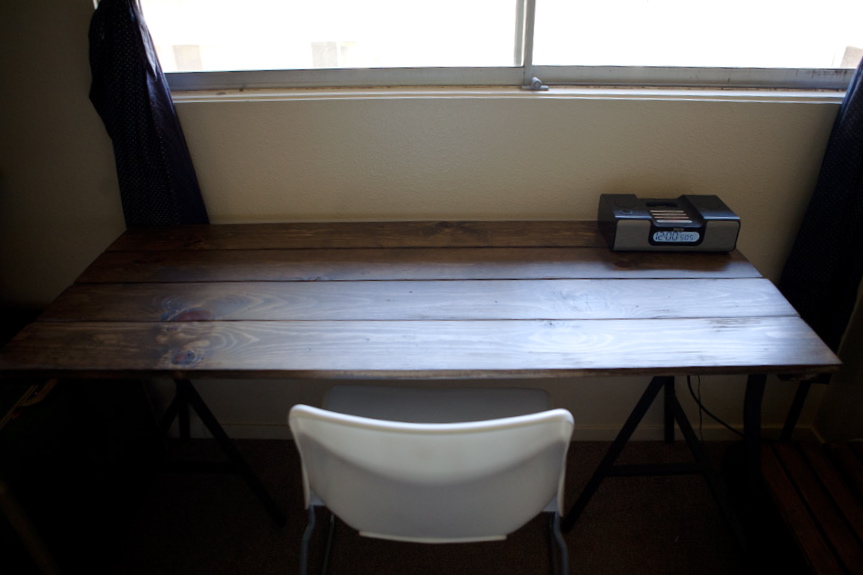
YES!

I LOVE IT!


it also looks so much less cluttered, possibly because we just put all of our clutter in the closet. hahaha

it is so much more our style, and guess what?

making two of these desks cost about as much as one of our old desks!

i think the total cost was about $30 per desk
do you liiiike?
looooooovesss it! dark stained distressed wood is just so awesome looking! great job!
ReplyDeleteBeautiful!!
ReplyDeleteNew favorite post!
ReplyDeleteI love this!!!
ReplyDeleteVery clever Nicole and of course I like!
ReplyDeleteBecky from Blue Belle Lovely
xo
mary@mail.postmanllc.net
ReplyDelete