Showing posts with label projects. Show all posts

April 6, 2012

wedding dress finale

remember this wedding dress i was helping a friend refashion (here and here)? 
well, the time came and the dress was finished and not only do i have pictures of the dress in action- as promised- but i also have pictures of the original dress! ahhh! so let's look at this dress' life.... 


some time ago, this was my friend's mother-in-law's wedding dress. and can i just say i love it?! almost as much as i loooove her hair :)


so it hung in a closet for a couple of decades and one day resurfaced and was tried on by my friend.

we immediately started chopping it up


it was a little sad because it had such an awesome life but we both knew we were giving it a new life. and without a pattern, we have a bit of a challenge hahaha


but the day came, many years later, and the dress looked fantastic


 then

 now

love love love :)


April 4, 2012

sharpie surprise

sometimes, life gets a little ghetto.
let me explain.
i had an interview for graduate school and i found the most amazing outfit at h&m and had to match it with a pair of black heels. after some deliberation i decided theses had the best shape and whatnot
overall.....scuffed

however as you can see they weren't in the best of shape

weird white scuffs along the side

i used to wear these shoes allll the time. my sister wore them to prom back in high school and she gave them to me. bliss!

dirt on the heel, as well as a huge rip

so, i figured there had to be a way to make these shoes look presentable again

white scuff on the back, wear on the wedge
 and that is where one of my most favorite crafting secrets ever.... (and it is a somewhat ghetto secret)

sharpie!


so i just filled in the blanks. and by blanks, i mean all those scuffs

before: scuffs on heels

after: scuffs on heels


white scuffs, brown scuffs, all gone!!!

weird white scuffs on the side, gone!


it's almost like....brand new shoes!
hahaha not quite

so, go find a pair of scuffy shoes and fill them in! 
it isn't absolutely perfect, but it makes your shoes look like they are one color instead of beat to crap
like most of my shoes are
see?! you can't even tell!
this doesn't just go for black shoes either, you could simply find a sharpie to match your shoes
and there you go!

do you have any secret crafting secrets?

February 22, 2012

it's almost here....

so, i have been helping a friend refashion her wedding dress.
it's pretty stellar
this last appointment, we did the top and since we met on a monday everything went wrong. hahahaha i think we cut one of the sleeves four or five times before getting it right

gotta love not using a pattern.... 

but it is turning out pretty rad

and i love me a scalloped edge...

i am so excited for them to get married and to see this dress all done up!

oh and their photographer is a babe ;)

what projects do you all have going on out there? i want to hear about them!

February 8, 2012

i've gone a-bunting

we have had our run ins with buntings before here on cola cola island (remember this? and this?), so it should come as no surprise that i finally wanted one just for me. well not really for me, more like my husband for his birthday (which was awesome)


because it is felt, it is nice and sturdy. not all flippy floppy, which i liked.

have a special occasion that you need a bunting for? or just want to make one for fun?

well you will need


(ignore the pinking shears, you don't need them)
assorted colors of felt
a cutting mat (optional)
a rotary cutter (or scissors)
embroidery thread
a hole punch
a sewing machine with a cool stitch setting

let's hop to it!

1. take a piece of felt and cut it in half. use one half to make the size triangle you would like. 
it took me  a bit of snipping and trimming, but eventually you will get your perfect triangle!

2. now use your first triangle as a pattern for the rest. i could fit three triangles on one piece of felt, and i cut cut cut! you will need 14 triangles total for this bunting

3. i used pins to outline the letters i wanted to make. again, this is going to be different for everyone depending on if you want to use lower or upper case letters, or both. once you have pinned your letter outline, sew on a decorative stitch setting. try and pick a stitch that is thick so you can see the letters from afar
remember that perfection is NOT important. so if your p is looking weird, awesome. you made a new kind of p that no one else ever has before. good for you :)

4. with all of your letters sewn, bring out the hole punch and punch two holes on the top sides of each triangle

5. pull out your embroidery thread and basically just thread the letters onto the thread

6. leave about 1.5-2 feet extra one each side for hanging and knot the ends of the thread

7. hang it!

ahhh so cute :)

i want to make a mini one to put across my desk wall....note to self put that on my project list...


if you were to make a bunting, what message would you put on it?

February 1, 2012

west elm inspired shower curtain

oh my gosh.
oh my gosh.

this project was SO MUCH FUN that i could hardly wait until wednesday to show you. when i finally finished i just couldn't handle it.

...i was squealing. no big deal.

so when i first saw this shower curtain from west elm i wanted it. sooo bad. 

it even went on sale and that made it a couple bucks cheaper, but i could not justify paying almost $40 for a shower curtain especially since my last shower curtain was plastic and on sale for $8.


.....so i made it. and i LOVE it.

i know you want one too.


soooo you need
2 1/2 yards of two different colored fabrics
coordinating thread
grommets
fusible interfacing (i used heat and bond)

1. cut you stripes. this is the hardest, most laborious part. you will need four grey stripes and three white stripes measure 73" long and 11.5" wide (that includes seam allowances)


2. sew your stripes together. again, this is laborious. there is a lot of fabric. but take a white and a grey stripe, pin them together, and sew with a .5" seam allowance. repeat until all of the stripes are sewn together 
note: if you are lucky enough to have a serger, i would use it for this part

3. cut off any excess fabric on the sides that didn't line up

4. fold under .25", then fold under again on the bottom of the curtain. pin and sew :)

5. do the same to both sides of the shower curtain, alternating thread between white and grey fabric

6. now for the top. what i did first was folded the fabric over twice on the top to see how long i wanted the top to be. it ended up being about 4.5". 

so on the wrong side of the fabric, iron on the fusible interfacing. tear off the plastic, fold over the fabric and iron the interfacing down

7. fold over one more time and pin. then sew

8. sew a stitch on the very top of the shower curtain to reinforce it

9. figure out how many holes for your shower hooks. i needed twelve. so divide how many you need by 72". keep in mind you need hooks very close to both ends. pin where you want to place your grommets

10. i used these grommets. they are great :) keep in mind that you will also need a hammer hahaha and start banging away!

11. go into your bathroom, take that old curtain down......
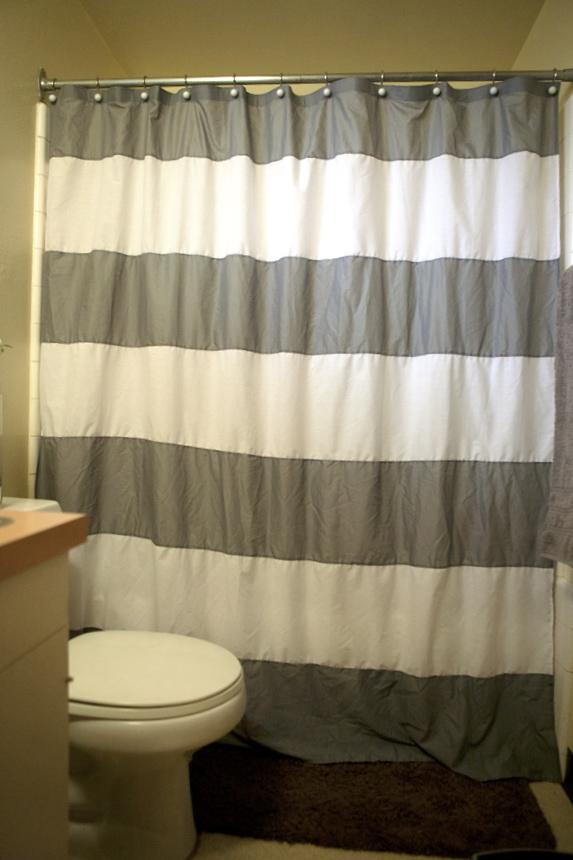
BAM!

ahhhh! are you dying?! i am dying. i love it so much!


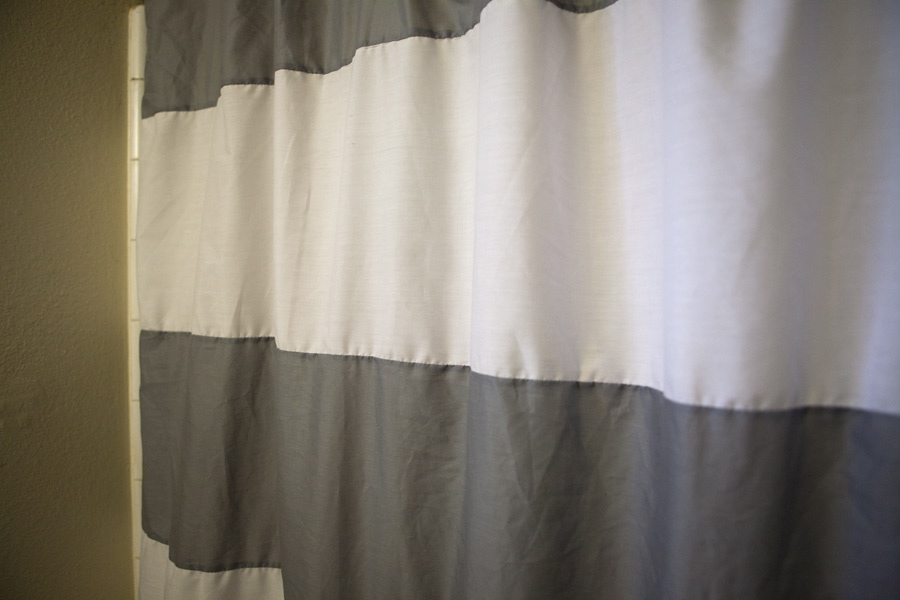
the big stripes are so bold, yet very understated. does that even make sense?


this basically made my week. so, go make one! it will be so much fun!


PS- random grad school update. two schools completely applied for and just waiting to hear back from. only one more application left. yes!

have a wonderful wednesday you winsome people!